Monday, August 8, 2011

Back to School Blog Hop Winner!

Congratulations
smyiow from my-o-scrappin 
"Those look like great gifts! I am sure everyone loved them! Good job!"

Please email me your information so I can send out all your fun scrappin' goodies! You will have one week to contact me before I choose another winner. Also, I submitted Tanya from Scrappin' KY Momma to Queen of my Craftroom for the drawing for the sponsored prizes.
(Both names were picked from Random.org.)

Thank you to everyone that participated in my very first blog hop. I enjoyed reading everyone's comments. Also, welcome to all my new followers!! I hope you enjoy my blog and get some inspiration from my layouts, cards or projects.

Sunday, August 7, 2011

Back to School Blog Hop - Day 2

Welcome to day 2 of the Back to School Blog Hop! You should have come from Andrea's Coffee Time. If you would like to start at the beginning of the hop, then head over to Queen of my Craftroom and join in the fun! We have 3 sponsors: Karbar Digital Stamps, Jen's Digi Stamps, and Hambo Stamps. Each sponsor is giving away a digi stamp. Details on how to enter for the drawings from our sponsors will be on Queen of my Craftroom's blog.  There will also be blog candy along the way, so sit back and enjoy all the creative ideas that these talented ladies are sharing!

My project today is one of my favorites! It is an altered notebook. This time of the year you can pick these up for next to nothing. I think I paid 25 cents for mine at Walmart!!


I've made several of these in the past as gifts, but I decided to make one for myself to have at the beginning of my school year. They are so simple to do and depending how elaborately decorated you want it, they are relatively fast to make. The black printed paper is from the Grade School paper pack from DCWV. I used Hello Kitty Greetings for the stack of books cut at 5 1/2 inches. I added a white shadow, but made it about a half inch smaller and inked the edges so it didn't look so huge!  I used the Hello Kitty Font for my last name cut at 1 1/4 inches. I used my Gypsy to weld the shadow feature in the same light blue cardstock as the middle book. The top letters are in the same yellow cardstock as the top book. I used the Cuttlebug folder Polka Dots to emboss the apple and red mat under my name. I used green cardstock as the bottom mat that matches the bottom book. I added some doodle dots with my black gel pen on my name and a little bit of lime green stickles on the leaf of the apple. I used Stickables Franklin sticker letters to add titles to my books. (These are the subjects I teach.) My favorite part of this notebook is the cute ruffled ribbon I found in my stash. I used glue dots along the seam of the paper and edge to add the ribbon. I used my iRock to add big rhinestones to the side and teeny tiny rhinestones on the red background paper. The back of the notebook is just a printed paper from the same Grade School paper pack, but no other cuts were added to the back. (I forgot to take a picture of that.) This project will also be My Sheri Crafts Back to School Challenge.

**Blog Candy Giveaway**


I will be giving one lucky person some crafting goodies! Included are 2 alphabet label stickers, journal tags, decorative sticky notes, fun fibers, beach themed paper stack, a set of scalloped cards with envelopes, a heart stamp, a Star Cuttlebug folder and a Creative Memories Mini Parfait set. All you have to do is leave a comment on both of my posts for this blog hop (Saturday and Sunday). I will use Random.org to select a winner on Sunday August 7. You do not have to follow my blog, but I encourage you to browse my blog and if you like what you see, I would be happy to have you as a follower! Thanks for stopping by! Now, hop on over to Kimberly's Crafty Spot.


Back to School Blog Hop Line Up:

Stephanie ~ Always Crafting
Mila ~ Milamemories
Bobbi Jo ~ Sweet Sassy Diva
Kerri ~ Cares of Kerri ****you are here****
Kimberly~ Kimberly's Crafty Spot ****next****
Jamie ~ JME Creations

Saturday, August 6, 2011

Back To School Blog Hop - Day 1

Welcome to my very first blog hop! Since I am a Fourth Grade teacher, I thought it would be fun to do this Back To School Blog Hop hosted by Michelle at Queen of my Craftroom. Both of my projects are for my classroom, but can be adapted to any child that is going back to school.

You should have come from Andrea's Coffee Time. If you would like to start at the beginning of the hop, then head over to Queen of my Craftroom and join in the fun! We have 3 sponsors: Karbar Digital Stamps, Jen's Digi Stamps, and Hambo Stamps. Each sponsor is giving away a digi stamp. There will also be blog candy along the way, so sit back and enjoy all the creative ideas that these talented ladies are sharing!

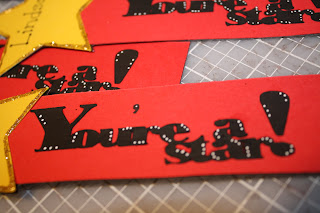
My project for today's is a class set of bookmarks. My theme for my classroom this year is Hollywood: Lights, Camera, Action!.


I made these personalized bookmarks by using the George and Basic Shapes cartridge. Using my Gypsy, I welded a 1 3/4 x 5 1/2 rectangle and star together in black cardstock. I added another rectangle cut at 5 3/4 x 1 1/2 out of red cardstock. (To save time, I just used my paper trimmer to cut these out.) I added the 3 x 2 3/4 yellow star to the top of the bookmark. I used the Cindy Loo cartridge to add the words You're a star! The letters were 3/4 inches in height. Again, I used my Gypsy to weld the letters together. I used my while jelly pen to add dots to the phrase and personalized the stars using a black gel pen for my students' names. Lastly, I trimmed the star with gold stickles. Once I'm back to school I will laminate these and hand them out the first day of school.

There are so many ways you could do different bookmarks for you own child. Throughout the school year I will make more bookmarks using seasonal cartridges, Locker Talk, and my favorite cartridge, Create a Critter just by changing out the star topper. Be sure to check back tomorrow to see my next project! Now, hop on over to Kimberly's Crafty Spot.

**Blog Candy Giveaway**

I will be giving one lucky person some crafting goodies! Included are 2 alphabet label stickers, journal tags, decorative sticky notes, fun fibers, beach themed paper stack, a set of scalloped cards with envelopes, a heart stamp, a Star Cuttlebug folder and a Creative Memories Mini Parfait set.  All you have to do is leave a comment on both of my posts for this blog hop (Saturday and Sunday). I will use Random.org to select a winner on Sunday August 7. You do not have to follow my blog, but I encourage you to browse my blog and if you like what you see, I would be happy to have you as a follower! Thanks for stopping by!


Back to School Blog Hop Line Up:

Susan ~ It's Me Susan P 
Jill ~ The Scrapoholic 
Lynne ~ Her Craftiness 
Tammy ~ The Purple Muse 
Anita ~ Anita and Bugs 
Stephanie ~ Always Crafting 
Berenice ~ Karber Digital Images 
Kristen ~ My Fantabulous Life 
Mila ~ Milamemories
Bobbi Jo ~ Sweet Sassy Diva 
Kerri ~ Cares of Kerri  (you are here)
Jamie ~ JME Creations
Misty ~  The Daily Scrapper

Friday, July 22, 2011

Birthday Girl Layout

Today I was lucky enough to get about 4 hours of crafting done. Karli was at mother's day out and a friend came over to crop with me. We talked a lot and stopped long enough to have lunch so I only managed to get a 2 spread layout done and a birthday card (post & pics coming soon).  I know, I know, you are thinking 4 hours and that's all you got done! Yep! I'm slow and still trying to learn my Cricut Expression 2. 

Recently I came across 4x6photosketchblog that has tons of great layout designs, all using 4x6 pictures. I really hate cutting pictures down so this was an exciting discovery!  This is a blog I will be visiting a lot when I am scrapbooking.  I went back to a post on March 13 to find a layout that I wanted to use. I changed up the second page layout a little bit since it had 2 verticle pics and I only had one I wanted to use. After taking this picture I realized I had forgotten to journal in the empty pink space. I was too lazy to take another picture after I had journaled! :) TFL


click image for a closer look

Recipe:
2 green 12x12 cardstock
1 printed cardstock cut in half
2 coordinating 8 1/2x9 cardstock
stacked gifts on the left - Just a Note pre-loaded cartridge on E2
single gift on the right - Cricut American Alphabet pre-loaded on E2
Title - George Font (shadow was welded w/ Gypsy)
Stickles for a little bling

Sunday, July 17, 2011

Moooving card

I made an adorable card for our neighbors that are moving to Colorado this weekend. I am submitting it for My Pink Stamper's Design Team. She asked us to create something using our favorite Cricut cartridge and using the colors turquoise, orange, brown and green.  This was the first time I made a longer card of this type. I loved how this card turned out (and my play on words)!! TFL


Recipe:
8"x9" sheet of turquoise paper (folded in half)
Green grass cut at 8 3/4" (used Everyday Paper Dolls cartridge)
Cows cut at 3", 2 3/4" and 2 1/2"
Orange font was cut at 1 1/2" (Gypsy Font & Mickey Font....welded w/ Gypsy)
Pop dots for the cows
Black gel pen for stitching
Green gem on little cows bow (from CAC lamb)

(inside)
Lamb cut at 3"
Font cut at 1 1/2" Gypsy Font.....welded w/Gypsy)


Tuesday, July 12, 2011

Wedding Tri-Fold Card

It's not real often that my hubby, Marcus asks me to make a special card for someone. So, when he asked me to make a wedding card for a co-worker I knew just the cartridge to use.....Sweethearts!! I love the look of Tri-fold cards so I went to creating a special card for the bride and groom.  I used the same color pink that was on their invitations, black cardstock and shiny silver cardstock for this beautiful card. I used the blackout feature to cut out the bride and groom. The groom was cut at a height of 5 inches and the bride at 4 1/2. I did have to change the width on my Gypsy to get her and her bouquet to fit properly on the back section. I used a few more icon cuts from this cartridge including the rings, a gift, the hearts and the words Love and Mr. & Mrs . I made a pocket from Tags, Bags, Boxes and More to hold the gift card. I used My Pink Stamper stamps for the Congratulations and On Your Wedding Day. Pop dots were used to add dimension to the word Love, the bow on the gift and the wedding rings. Of course I had to add diamond stickles for a little bling on the diamond ring. I also added pink stickles to make flowers on the bride's bouquet and diamond stickles for the ribbon hanging down.  I used a white jelly pen to add our sentiment and names. TFL!!


Directions for a Tri-Fold Card

1.  Cut a 12x12 piece of card stock in half.
2.  Score at 2", 4", 8" and 10".
3. With a paper trimmer, place paper at 1 1/2 and cut from the 2" to the 10" score lines.
4.  Flip your paper and do the same on the other side.
5. Follow the picture below for the folding.....not sure how to explain it in a way that people can understand! :)


6.  I cut all my top paper 1/4 inches smaller than each section I am putting on the base.

I hope that is clear enough for everyone that wanted to know how to make a tri-fold card. It's really not as difficult as it looks. Once you make one, you will be hooked!

Friday, July 1, 2011

Swim Lessons Layout

I just discovered the blog for Pagemaps. (Maybe a little late, but I'm glad I discovered it!)  Becky Fleck is the designer of the page maps and blog. She has some really great stuff on there! Also, she just happened to have a Best Creations Sketch Contest. I loved the layout and had some pictures on my desk for I don't know how long that I NEEDED to get on a page! Here is the sketch for the contest:


Since these were of Karli's first swim lessons, I knew I didn't want to use birds, but I could use fish. I went to my all-time favorite cartridge (Create a Critter) and decided to use, not only the fish, but the whale and the darling sea horses. Here is my creation based on Becky's sketch:


I can never just do one page because I think a layout consists of two pages that share a common interest. I just so happened to have a 5x7 of Marcus's favorite picture (that he took himself) of Karli at swim lessons. I used a cute mat from Once Upon a Princess and added an extra fish and a momma sea horse with her two baby sea horses. Here is the other side of the layout:


And here is the completed DOUBLE layout together.....journaling and all!!!